
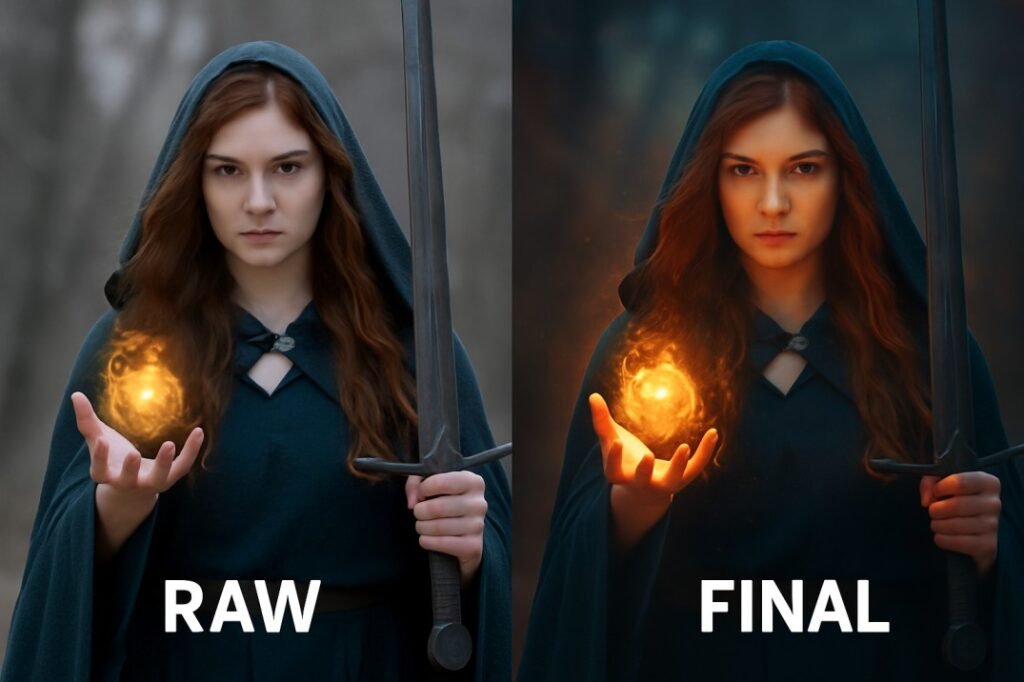
Let’s be real: the journey of a fantasy photograph doesn’t end when you press the shutter. In many ways, that’s just the beginning. What we do in post-production—the digital darkroom—is where we truly bring our visions to life. It’s where we enhance the drama, intensify the mood, and add those final touches of magic that make an image unforgettable.
But you can’t craft a masterpiece with blunt tools. The right software and hardware form your post-production toolkit, turning a tedious chore into a powerful and even enjoyable creative process.
As a fantasy photographer, my needs are specific: I need to render intricate costume details, sculpt with light and shadow, and often create believable magical effects. After a decade of editing everything from elven portraits to cyberpunk warriors, I’ve settled on a suite of tools that offer the best balance of power, value, and reliability.
This guide walks you through the essential software and hardware I use to take my images from good to gallery-ready.
Who This Is For: Photographers ready to invest in a efficient, powerful workflow for editing their conceptual and cosplay work.
How We Picked and Tested
We judged these tools on:
- Power & Features: Does it have the capabilities needed for professional-level editing?
- Workflow Efficiency: Does it speed up your process or get in the way?
- Value: Does it provide a fantastic return on investment?
- Industry Relevance: Is it a standard tool that enhances your professional standing?
The Top Picks, At a Glance
| Tool | Category | Why It’s Essential | Our Pick |
|---|---|---|---|
| Adobe Lightroom Classic | Photo Management & RAW Development | The hub of your workflow | Adobe Photography Plan (20GB) |
| Adobe Photoshop | Pixel-Level Editing & Compositing | For advanced retouching & magic | (Bundled with Lightroom) |
| Wacom Intuos Tablet | Input Device | Precision editing that feels natural | Wacom Intuos S (Small) |
| BenQ PhotoVue Monitor | Hardware | To see true colors & details | BenQ SW Series (or GW Series) |
Your Digital Lightroom: Photo Management & RAW Development
Our Pick: Adobe Photography Plan (20GB) – $9.99/month
Let’s start with the non-negotiable heart of any photographer’s workflow: Adobe Lightroom Classic (not the cloud-based “Lightroom”). This is where you’ll import, organize, rate, and perform 90% of your edits.
- Why we love it: Lightroom is incredible for its non-destructive editing. Every slider adjustment you make is a instruction that can be changed or undone at any time, leaving your original file untouched. Its organizational system (collections, keywords, flags) is indispensable for managing thousands of cosplay photos. The power it offers for adjusting exposure, color, and detail is more than enough for most images.
- The Downside: It’s a subscription. Some folks prefer a one-time purchase, but the value of constant updates and seamless integration with Photoshop is unbeatable for professionals.
- Pro Tip: The Adobe Photography Plan bundles Lightroom and Photoshop together for one monthly price. It is, without a doubt, the best value in photography software. You can’t buy one without the other in this plan, and you shouldn’t want to.
- What to get: The 20GB plan is plenty for starting out. You can always upgrade cloud storage later if needed.
Check current pricing for the Adobe Photography Plan on Amazon
Note: Often sold as a digital code/gift card.
The Wizard’s Workshop: For Advanced Retouching & Magic
Our Pick: Adobe Photoshop
While Lightroom handles global adjustments, Photoshop is where you go for pixel-perfect precision. This is your tool for advanced retouching (removing distracting background objects, cleaning up costumes), compositing (blending multiple images), and creating magical effects from scratch.
- Why it’s essential: Want to add a glowing rune to a sword, create ethereal energy emanating from a hand, or perfectly blend a studio shot with a fantasy background? You do that in Photoshop. Its layer-based system gives you ultimate creative control.
- The Downside: It has a steeper learning curve than Lightroom. But you don’t need to know everything. Learning a few key techniques (layers, masks, cloning, and brushes) will cover 95% of a fantasy photographer’s needs.
- Pro Tip: Use the “Edit In” function from Lightroom to send a copy of your file to Photoshop with all your Lightroom adjustments already applied. When you save in Photoshop, the edited file automatically appears back in your Lightroom catalog. This workflow is seamless.
(Bundled with the Adobe Photography Plan above)
Your Digital Brush: A Drawing Tablet
Our Pick: Wacom Intuos S (Small)
Trying to do precise retouching in Photoshop with a mouse is like trying to paint a miniature with a roller. A graphics tablet is a game-changer. It gives you pressure sensitivity and a natural drawing feel, making tasks like dodging & burning, detailed masking, and cloning infinitely easier and faster.
- Why we love it: Wacom is the industry standard for a reason. Their drivers are reliable, and their tablets are built to last. The Intuos S is the perfect entry point. It’s affordable, has a comfortable active area, and includes customizable express keys. It will fundamentally change how you interact with your photos.
- The Downside: There’s a brief awkward learning curve as your brain adjusts to hand-eye coordination between the tablet and the screen. Stick with it for a week; it will soon feel like second nature.
- Pro Tip: Start by using the tablet for just one task, like brushing in adjustments on a mask. As you get comfortable, you’ll start using it for everything.
Check price for the Wacom Intuos S on Amazon
Your Window to the Truth: A Calibrated Monitor
Our Pick: BenQ SW Series (Premium) / BenQ GW Series (Budget)
This is the most critical hardware investment after your camera. If your monitor doesn’t display accurate colors and contrast, you’re essentially editing blind. You might make an image look perfect on your screen, only for it to look muddy and off-color everywhere else.
- Why it’s essential: Monitors like those in the BenQ PhotoVue series are factory-calibrated and designed specifically for photographers. They cover a wider color gamut (like Adobe RGB), which is crucial if you ever plan to print your work. They ensure that the vibrant red of a cape or the subtle glow of magic you see is what everyone else sees too.
- The Downside: A good photo monitor is a significant investment.
- Pro Tip: While the SW series is the professional gold standard with hardware calibration, the GW series is a fantastic, more affordable alternative that still offers much better color accuracy than a standard desktop monitor.
Check price for BenQ PhotoVue Monitors on Amazon
The Unsung Hero: Reliable Storage
Our Pick: Samsung T7 Shield 2TB External SSD
RAW files are huge. And you should always have your photos in at least two places. A fast external SSD is perfect for storing your active Lightroom catalog and current projects, making backups speedy and allowing you to work on different computers.
- Why we love it: The Samsung T7 is incredibly fast, reliable, portable, and surprisingly affordable for the space it provides. It’s also durable. Use this for your working files and pair it with a larger, cheaper HDD (like a Western Digital My Passport) for long-term backup.
Check price for Samsung T7 SSDs on Amazon
The Final Edit
You don’t need to buy it all at once. Prioritize the workflow:
- Step 1: Get the Adobe Subscription. This is your software foundation.
- Step 2: Invest in a Wacom Tablet. This will be the biggest immediate improvement to your editing speed and precision.
- Step 3: Save up for a PhotoVue Monitor. This ensures all your hard work is accurately represented.
- Step 4: Use a Fast SSD to keep your workflow smooth.
This toolkit isn’t about fixing bad photos; it’s about empowering you to fully realize the epic vision you had when you clicked the shutter.
As an Amazon Associate, I earn from qualifying purchases. Using these links is a great way to support the free guides and content here on ZelphyPix. Thank you!