
Ever look at a fantasy portrait and wonder, “How did they get that dreamy, magical effect? Is that Photoshop?” Sometimes it is. But often, the answer is much cooler: it’s created right in the camera with a simple piece of glass.
I’m talking about prisming. This is one of my all-time favorite techniques for adding a dose of pure, unpredictable magic to my photos. It feels less like science and more like alchemy. By holding a simple photography prism or crystal ball in front of your lens, you can bend light, warp reality, and create stunning, one-of-a-kind images that are impossible to replicate perfectly in post-production.
The best part? It’s incredibly affordable and an absolute blast to experiment with. This guide will walk you through the tools and techniques I use to create these effects, from subtle light leaks to full-on mind-bending distortions.
Who This Is For: Photographers looking for a creative, hands-on way to add unique flair to their fantasy and portrait work.
How We Picked and Tested
We focused on tools that are:
- Optically Clear: Cheap, plastic alternatives will produce blurry, disappointing results.
- The Right Size: A prism or ball that’s practical to hold and manipulate in front of the lens.
- Versatile: Tools that can create multiple different effects with a little creativity.
The Top Picks, At a Glance
| Tool | Effect | Best For | Skill Level |
|---|---|---|---|
| 6-Inch Triangular Prism | Light leaks, flares, splits | Adding magic & mystery | Beginner |
| 80mm-100mm Crystal Ball | In-camera refraction, “tiny world” | Surreal, mind-bending scenes | Intermediate |
| Knight Glass Prism | Higher-end clarity & coatings | The serious enthusiast | Pro |
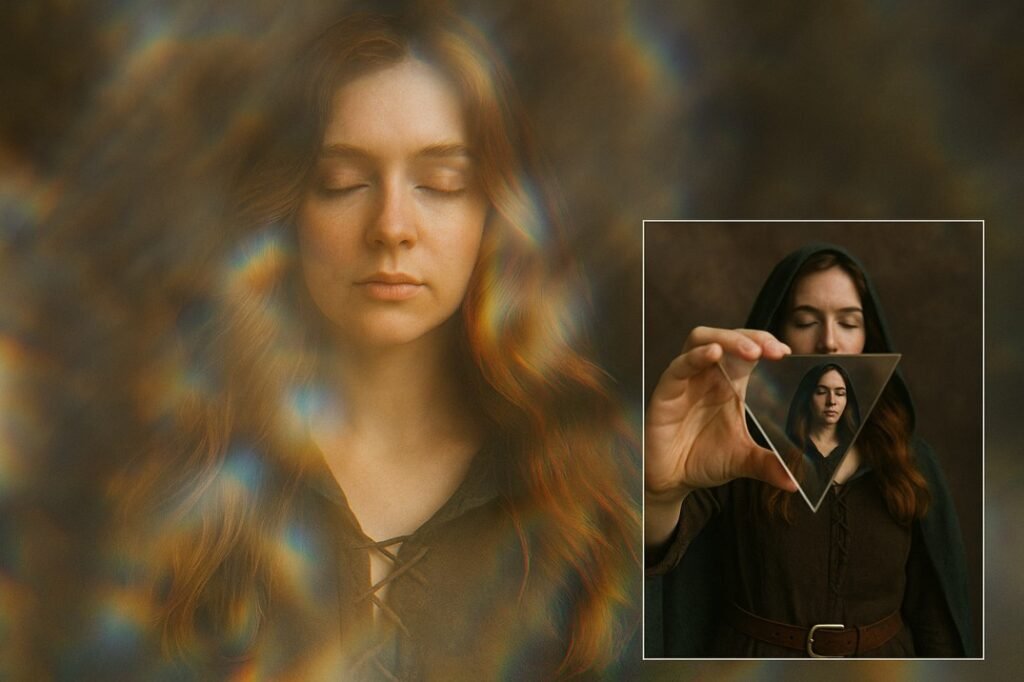
For Eerie Flares and Light Leaks: The Triangular Prism
Our Pick: A 6-Inch Optical Glass Triangular Prism
This is the quintessential tool for prisming. It’s the easiest to hold and manipulate, and it’s your gateway drug into the world of in-camera effects.
- Why it’s essential: A prism bends light. When you place it strategically in front of your lens, it can:
- Create Rainbows: Catch a strong light source and project a spectrum of color across your image.
- Generate Ethereal Flares: Soft, beautiful light leaks that wash over your frame, bleaching contrast and adding a dreamlike quality.
- Duplicate Your Subject: Split the lens to create a “ghost” or mirror image of your model within the same frame.
- Pro Tip: Start with your lens set to a wider focal length (like 35mm or 50mm). Have your subject stand to one side of the frame. Hold the prism over the opposite side of your lens and slowly rotate it. Watch through the viewfinder as the magic happens! You’ll see flares appear and disappear. Shoot in Manual mode, as your camera’s light meter will be confused by the extra light.
- What to get: You want a 6-inch triangular prism made of optical glass. This size is perfect for handling. Avoid tiny, toy-grade prisms; the optical quality matters for a sharp effect.
Check price for 6-inch photography prisms on Amazon
For Mind-Bending Refraction and “Tiny Worlds”: The Crystal Ball
Our Pick: An 80mm Optical Glass Crystal Ball
If a prism bends light, a crystal ball wraps it. This effect, known as refraction, allows the ball to act like a giant lens element, capturing a upside-down and right-side-up miniature scene inside the glass.
- Why it’s essential: A crystal ball lets you create incredibly surreal images. You can capture an entire landscape or castle within the ball, while your model interacts with it in the foreground. It’s perfect for creating a narrative of scrying, prophecy, or pure magic.
- Pro Tip #1 (The Shot): Use a telephoto lens (our pick, the Sigma 56mm, is perfect). Place the ball close to your camera on a steady surface (or have a helper hold it), and have your model stand far behind it. Focus carefully on the scene inside the ball. The outside world will fall away into a beautiful blur.
- Pro Tip #2 (The Cleanup): Crystal balls are smudge magnets! Keep a microfiber cloth handy to wipe away every fingerprint before you shoot. The difference in clarity is massive.
- What to get: An 80mm or 100mm ball made of optical glass (not acrylic). Acrylic will have imperfections and create distortions that look cheap. The glass ball comes with a stand and a pouch, which is essential for storage and for setting it down safely between shots.
Check price for 80mm optical glass crystal balls on Amazon
The Competition and Considerations
- Knight Optical Prisms: If you fall in love with this technique and want the absolute best optical quality with anti-reflective coatings, brands like Knight Optical are the professional standard. They are significantly more expensive, so we only recommend them if you know you’ll use it constantly.
- Lensbaby Products: Companies like Lensbaby make dedicated creative-effect lenses that can produce similar results. They are fantastic but represent a much larger investment than a $25 prism.
The Essential Accessory: Microfiber Cloths
This might seem silly to single out, but it’s not. It’s critical. You will be handling this glass constantly. A single fingerprint will ruin the clarity of your effect. Buy a large pack of microfiber cloths and keep them everywhere—your bag, your pocket, your car.
Check price for microfiber cloth packs on Amazon
How to Put It All Together: A Beginner’s Workflow
- Gear Up: Mount your camera on a tripod. This frees up both your hands to hold the prism.
- Set Your Settings: Switch to Manual mode. Set your aperture (a mid-range like f/4 or f/5.6 is a good start) and adjust your ISO and shutter speed for a correct exposure without the prism.
- Compose: Frame your shot without the prism.
- Experiment: Hold the prism just outside the edge of your lens. Slowly move it into the frame while looking through the viewfinder. Rotate it. Tilt it. Watch how the light changes.
- Shoot: Take lots of photos! The effect changes with the slightest movement. Embrace the happy accidents.
The Final Exposure
Prism and crystal ball photography is a return to playful experimentation. It’s about letting go of total control and collaborating with light and physics. There’s no “undo” button; you have to get it right in the camera. That process is incredibly rewarding.
Start with the 6-inch prism. It’s the most affordable and easiest way to dip your toes into these creative waters. The results will instantly add a layer of otherworldly magic to your fantasy portraits that will make your work stand out.
Now go bend some light.
As an Amazon Associate, I earn from qualifying purchases. These affiliate links help support ZelphyPix and allow me to continue creating free, in-depth content like this guide. Thank you for your support!